Monday, August 2, 2010

What a crazy {wonderful} weekend


Phew...Where to start? Well I last blogged to you all on Thursday and even then it was a blog posting for Thursday that I did Wednesday. Thursday and this weekend have been crazy. Let's start with {Thursday} which I am now dubbing the best day EVER! So, Thursday was my teaching day at Valencia {the college I work for} and because I am an education major teaching days are already my favorite days. I dropped the hubby off at work, got some coffee and came home to check all the blog updates. The first blog I went to was Charisma Cards where I found out that I had been chosen as their {August Guest Designer} SQUEEE!!! My first design team! The day got better after that. Thursday was my beautiful mother's birthday and I had decided to get her some Copic's as a gift. When I was checking out at the store the manager started talking to me and long story short, their Copic workshop gal is leaving and the store offered to have me Copic certified to teach their workshops! {Free Copic certification and their paying me in Copic's Double SQUEEE!!} So, next I went to work and my teaching seminar had such an unprecedentedly high turn out that my boss decided to give me a raise and a promotion!! Finally because it was my mother's birthday I got to have a wonderful dinner out with my family! Can you believe it? {and that was just thursday!}

Then, Saturday, was me and my husbands FIRST wedding {anniversary} The husband decided to interpret the paper anniversary this way:

So, as you can see he used {a few dollars worth of} my orange and yellow cardstock. My gifts are in the window. I wanted to start a little window garden so he found this beautiful window box for me and filled it with soil and seeds and some decorations from my wedding shower. He also got me a cute little yellow plant mister (on the left) and to add to the paper anniversary he wrote me a beautiful love letter {printed it out on a pretty sheet of my scrapbook paper} and framed it for me to keep! How cute is he? Some of my paper crafting skills rubbed off on him!

We took some beautiful one year anniversary pictures that day too which I am sure you will see in a future {scrapbook} page blog post!

So, phew....now lets get back to crafting!

Thursday, July 29, 2010

Thrifty {Thursday}: Vintage Ruler Project

Last thursday when I was out antique shopping downtown with my {mom} she found these excellent old beat up rulers {only .10 a pop} to paper craft with. We brought them home and got right to work. These would be excellent gifts for teachers, students, and fellow paper crafters! For starters here's what you will need:

  1. Wooden rulers {old or new}
  2. Sandpaper of some sort
  3. Glue and brush {Aleenes; School Glue; Mod Podge will all work}
  4. Decorative paper
  5. Embellishments
  6. A smile on your face!

Step 1: Sand the part of the ruler that you want to decorate. This should not include the ruler markings. You don't need to sand too much {you are just trying to remove the glossy top coat}

Step 2: Measure and cut a strip of decorative paper. Use the brush to apply a thin layer of glue and attach your strip of paper.

The last step: Embellish your little heart out. Rhinestones, pearls, flowers, rubons, stamps, you name it. And then you're done! {How simple and cute was that?}

Happy {thursday} to all!

Tuesday, July 27, 2010

{Tutorial} Tuesday: Straight pin accents and {giveaway!}


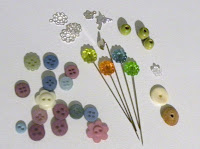
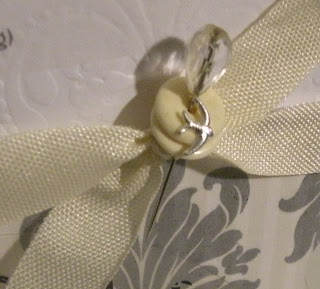
So as I said the other day when I posted the play date cafe challenge card with the little stick pin I would be showing you some delicious {variations} on stick pin decorating. First off my favorite pins to work with are the vintage ones that I have found at antique stores and thrift stores. The heart and glass bead top stick pins in these photos were bought at an antiques store and I adore them! {there are some in the giveaway!}

Buttons buttons who's got the button! Buttons are the most common pin adornment that I have seen. My favorite way to use them is like this: with several similar button shapes and colors. You can mix and match of course or just use one. This is an excellent way to pull a little more of an accent color into the piece.
Next is beads! Beads can be done a lot of ways. If you jewelry making is part of your craft repertoire you can make a multi-layer dangly bead like you would for an earring with jewelry pins and your plier sets {picture on the left}. Or if you have some charms and are not good with the jewelry making do what I did on the right {and in the play date cafe card} put the top circle part of the charm in between a pair of pliers and bend it down so the charm and the charm hole at the top make a 90 degree angle. This will make your charm lay flat in front of the pin rather than stick straight out {and you wont have to put it on a jump ring!}
When using more than one bead you have a couple of options too. Use different shapes and colors to make an eye catching look or design a pretty shape from multiple beads.

If you liked this tutorial and you are a follower leave a comment below telling me your favorite part of adding decorative stick pins to your work. I will select a random winner during next weeks {tutorial} tuesday to win all the pins, beads, buttons, and charms used in today's tutorial, plus a few extras! {good luck}

The blog {candy}:
Monday, July 26, 2010

Challenge Submission: {Eight little presents!}

So today's card is for a sketch that I think just has so many possibilities! Thoughts To Paper's Challenge was to make a card or scrapbook page using this sketch {click here to try the challenge or check out their great blog!)

I turned the sketch on it's side and used the ornate shape from my last card as the bracketing. {which I love} Here's mine: {I have been in the mood to do my Christmas cards with all the Christmas in July sales, blogs, and blog hops going on right now!}


I loved making all the tiny presents and their little tiny bows! I glittered the presents, their bows, the ric rac and the sentiment to jazz it up a bit. I think this card has so many possibilities. I think it would be great as a Chanukah card with 8 little presents and the bracket on the side as an 8 or a birthday card with little girly packages for girls or bright bold colors for boys!


I also wanted to share with you this little fun idea I use. I had this cork that I loved with a super cute little fox on it and it had no real home so I put it on top of my paper piercer to protect it. So there you have it: {an excellent reason to go buy some wine!}

Stop by tomorrow for {tutorial tuesday} it's a cute one with a giveaway!

Saturday, July 24, 2010

Challenge Submissions of the {romantic} variety


Tonight's submission is pulling double duty again! I love combining challenges because the entries all become much more original. The color palette came from our wonderful friends over at The Play Date Cafe The colors for this challenge were {Black, Grey, White, and Cream} and once again I was inspired by the {story} behind the challenge. This go round the challenge palette came from a hotel that the host visited with her husband twenty years ago. {sweet, right?} so I couldn't help myself and made a romantic sweet card. I also pulled in a challenge from Charisma Cardz which was {anything but square} I pulled this in {obviously} in the ornate shape of the card.


The last thing I added was a sneak peak for you all at next weeks tutorial tuesday... On tuesday we will be looking at all the different ways to decorate those beautiful little stick pins we are all loving right now. I will be showing many different variations and giving away some blog candy. The candy will have some vintage {and not} stick pins plus charms, buttons, and all the other embellishments we will be showing that day. So make sure you are here for that!


{Materials Used:}
  1. Storybook Cricut Cartridge for shape
  2. Anna Griffin 1149 for the black damask print
  3. The paper company translucent classic stripe for the creamy stripe overlay on the damask
  4. Heidi Swapp mini overlays {clocks}
  5. Vintage pin and beads
  6. Tiny Swallow charm from Etsy {Smiling Frogs}

Winner {Winner} Chicken Dinner

Winners of the first five followers competition are ready! Two of you have already been contacted and sent me your addresses- Here are the remaining three:

  1. Valerie G.
  2. Jamie
  3. Brenda Burfiend
Congrats Ladies! Send me your home addresses @ JenniferOsteen@ymail.com to claim your prizes and thanks so so so very much for being my first followers. You all mean so much to me as I start this journey!

Also, while I have you here let me remind you there is a giveaway going on that only one person has taken a shot at. There are two thrifty thursday posts I will be pulling a random comment from them to win the thrifty thursday {prize pack} located in the first thrifty thursday post. Two posts + a comment on each = two chances to win!

Good luck and see you later tonight with another {post}!

Friday, July 23, 2010

{Contest Entries} with old world charm!

So, the Embellish Magazine contest for this week was very inspiring! The challenge was to use Kraft, Turquoise, Brown and Orange and also to incorporate some ric rac. They used some beautiful old world travel pictures to convey the color scheme and I was as inspired by those as I was the palette. Here is my submission:
I just loved the old world details I chose for the top left including this {beautiful old key} I got at a thrift store. Here is a close up of the corner embellishments:
If you would like to craft along with this challenge just click the Embellish Magazine Link in the first paragraph. I also thought this would be an excellent card for a man so I chose to make it a birthday card and enter it into Caardvarks Birthday Challenge! Click here to check it out.

Hope you were inspired... See you next {post}